I am now in my free period again at uni and so ill put more time into finishing the retrofit kit, when i happened to learn a crucial detail; backlight LEDs need to have a property known as high CRI, or, color rendering index. the meaning is self apparent, and likely is the overall balance or spread of spectrums that make up the white. I asked grok to help me find specific models of LEDs actually used in backlights so i could figure out if maybe a specific thing is needed, and while CRI might not be that key thing, it is nontheless critical, really though i was hoping to reverse engineer some sort of profile, or just outright buy a SMD roll of actual monitor lights, because they would also be suitable for the operating conditions, but if it gave me a clue for sourcing the ideal LED then, that would be a bonus.
Anyway i didnt find actual model numbers, LEDs are pretty hard to find that way, at best you can go to a specific manufacturer and just search what they have, a part number is ultimately just maker + dimensions and thats it. the rest is handled internally, and you usually cant search specific full-model identifiers from anywhere, much less google.
An added benefit of high CRI LEDs is while generic SMD LEDs might still have traces of yellow from diagonal light out of the phosphor gel lens (they are blue LEDs under a yellow phosphor to make white for those that dont know), high CRI LEDs by design cannot risk any distorted emissions like that and would reliably have eliminated them. I wasnt too worried actually but i feel better realizing i dont even have to think about it at all.
Fingers crossed as i search through options i encounter ones that actually state in the datasheet they are used in TVs and such. Once i finally locate some ill go to a PCB maker and see if i can get a big board of 10cm lengthed strips i can connect end to end and just snap apart, another thing ive realized from initial results is there are super long form factor LEDs which are always applied spaced very far apart, so i might not need a high sensity strip where the segments need to be bridged by LED, a simple jumper might do if 5-6mm gaps between LEDs are fine thanks to their beam angle.
Sorry about the wait, ive been busy with uni, so, so, so, soooooo busy, but i have been researching.
let me recap the final step of the backlight monitor driver issue, taking the signal from the monitor and having the microcontroller read that;
the cintiq generates a negative voltage analog signal, i have no clue why, but it does, possibly for safety reasons since this signal influences an oscillator circuit that generates high voltages, so little blips of high voltage will trend towards zero and short rather than overload the oscillator. maybe. anyway, reading a negative voltage isnt a simple thing, the first and most obvious solution was to find a negative voltage supply to run the microcontroller off of, if the input and output of a boost converter are totally isolated then ground is whatever pin you decide is ground, but finding negative regulators is hard and they come with some drama to boot.
Next solution which i had to learn about before trying to apply in uni, was voltage dividers with a pull down. the negative voltage signal would be used as the ground refference, so, id use the 0 – -5v signal, once divided, to pull the signal up and down by 2.5v. but there was issued with stability, and i had to protect the microcontroller from the negative voltage, there were too many unknowns and a lot of instability, and in the end i found out too the ADC of an ESP is not totally suited to this task to begin with, without some modifications.
But finally i found a solution which is just totally perfect. I will be using an external ADC, the ADS1015. its a VERY high resolution analog voltage sensor essentially, costs about $3, but it has 4 channels which is the important part. ADCs cant read negative, thats a given, but what you CAN do, is rather than comparing ADC-ground, you can compare the difference between ADC1 and ADC3. this can be used to safely read the signal as-is, with high stability to the extent no software “smoothing”. just for refference, even averaging out 3 seconds of signal input on an ESP8266 resulted in oscillations which would cause the backlight to flicker. But using an external ADC chip none is required, aside from a capacitor on the actual signal itself. This solution is one that either did not exist when the project begin, or took some time for the pricing dropped before it was viable, or perhaps i was simply not educated enough to know to look for it, im not sure, but i found it now, and its very much plug and play, and essentially infallible. Im currently away on holiday until around the 13th of jan, when i get back i will be resuming and finishing the project before my semester break ends, to finish this once and for all.
After the 24HD backlight driver is done, i have a 22HD i obtained cheaply which will then receive my attention (inverter is fine but its LEDs are blown, so will be doing an attempted fix of the LED strip, or, replacing entirely), as well as some really cool other projects which i will post about in the next week or so.
Some have asked if i will be making and selling the backlight drivers premade, plug n play, the answer is yes, i have actually been prepairing for that among other things, thinking about and learning circuit fab. In the end an ESP is the ideal microcontroller for this just for the singular reason that, i can make 2 sets of code, one for a full featured board, either my kit, or a self-build of it, and then the other will be for an “open loop” version, which does not attempt to sense the backlight signal and instead relies on a web interface if you want to change how bright the screen is, so you just log into the ESPs own little wifi, go to its home page, enter the % brightness and thats that. taking the “on” signal of the monitor is a no brainer so this, unlike how my monitor is right now, would still turn off when turned off, it will just have less convenient brightness control, but it doesnt require anything more than the ESP microcontroller, stepdown and LEDs, plus a little wire, very simple and graspable for anyone.
I was considering initially to use an STM based microcontroller since for voltage sensing and, basically everything this project needed it was perfect, however, the silicon shortage hit hard and caused even the $2 bluepill pricing to skyrocket, and consequently, the STlinks also went up, meaning the buy in price for just one STM microcontroller will be something like $20-30 depending on where in the world you are, for something which last year cost $2-5.
My goal is to finalize this project once and for all before the end of Jan. finalizing the project consists of the following milestones:
build (or rather, technically just assemble at this point) and install a fully functional backlight driver into my 24HD cintiq
document the construction of the final driver which includes some more detailed dissasembly footage with VERY thorough photography.
produce a final build instruction set for remaking it yourself, a parts list, and code
publish code for a “lite” version where you change brightness through wifi instead of reading the signal generated by the monitor.
before the end of feburary, ideally, i want to do the following, i dont know the timeline so, im uncertain if i could, since a lot of things will be done for the first time like;
design a PCB schematic file for the replacement driver
self-etch or have the the PCB manufacturered (timeline for either is uncertain, iv never sent schematics to be manufactured before)
find the name of the cable connector the wacom uses internaly so nobody needs to do DIY cable splicing and can literally just go plug n play in the most literal sense . finding these is very difficult.
I will begin reselling self-made cables with labels attached if it turns out i can only bulk buy or only get un-wired connectors, or at very least just providing them at-cost to anyone who asks me for them, besides of course providing its name/part number for anyone to attempt to self-source.
finally, i will attempt to list the first batch of complete drivers for sale, bearing in mind though they are first batch/for testing. revision 0. I dont forsee how they could fail since the PCB will essentially be a sort of shield, or just mounting board rather than wiring all the bits together, but who knows. all it is is just a circuitboard to replace a wiring loom, but still, the first batch will be sold conditionally like a sort of beta testing.
In march ill see what improvements, if any, can be made, then if all looks good, ill make a bulk-order of the driver PCBs and assemble, as well as just start selling the circuit board with self-assembly kits (including the female connector so no wire-cutting is needed).
this timeline i think is fairly reasonable, as of now, besides the fact im not at home for the next 2 weeks, i have everything that will be needed already sitting and waiting. but the 2nd stage, things to be done in February, will be dependent upon transit and processing times of entities other than myself, ive been told it can be quick, and done locally, but, its something im unfamiliar with. If time ends up being an issue i do have the capacity to self-etch a few of my own boards too, but thats all extra stuff for consumer products. If this doesnt go as fast as id like, i do have the ability to make semi-assembled plug n play connectors for the kits that will be a little messy but, will be essentially impossible to muck up yourself, because for this project, not to downplay the competency of the end users, we are talking about artists, people who for a living have mastered art, which is arguably the polar opposite of electrical engineering, working on their, usually irreplaceable $2000 art monitor which is sometimes the center of their income. even i myself felt very unnerved when i first cracked open the monitor, so imagine how it must feel for someone who probably doesnt even know what they are doing, but NEEDS to do it. with those people in mind i plan to make the repair as simple as possible with the smallest margins for error that i can manage.
So thats that.
Later ill also be posting some updates on other projects i have going or planned. Im currently visiting the fam up north, and half the time im bored as heck, storming up SOOOO many ideas i want to do once i get home again. Among them will include beginning the official Ronox engineering youtube channel. the final documentation/ dissasembly and backlight construction and installation/reassembly video will be posted on the new channel, to kind of christen it, and while your subscription would be appreciated, for now theres no need. In case anyone is wondering why im changing channels/accounts, its because my account is, in a way, corrupted, or broken, stuck with certain settings i cant ever fix, and honestly, monetization is my goal, thats something you need to maintain, so having any manner of head start wont really make a difference, its just as hard to go from zero, as it is to start with 20% of the subscribers and view time necessary. Also i may have bungled the new account too calling it ronox engineering, instead of just ronox, which i might not be able to change, so theres that too, youll be seeing more of me soon and ill soon be getting VERY active, i have too many plans now to remain idle.
Recently it occured to me that this 20KRPM brushless turbine i have that i can buy rather cheap too, incredibly efficiently consumes 300W of power. On paper, a 12″ x 24″ (~30x60cm) H14 Hepa can operate above the required 0.5m/s airflow with a mere 50-80W fan. One of the downsides of induction fans, the most common high power fans, is you cant change their speed unless they were designed with that functionality in mind. Ones that are, usually are incredibly expensive, offsetting their value. Usually a flowhood motor costs more than it needs to because it needs to work unregulated matched perfectly to your filter, producing more than 0.5m/s airflow while also not exceeding the pressure rating of the filter.
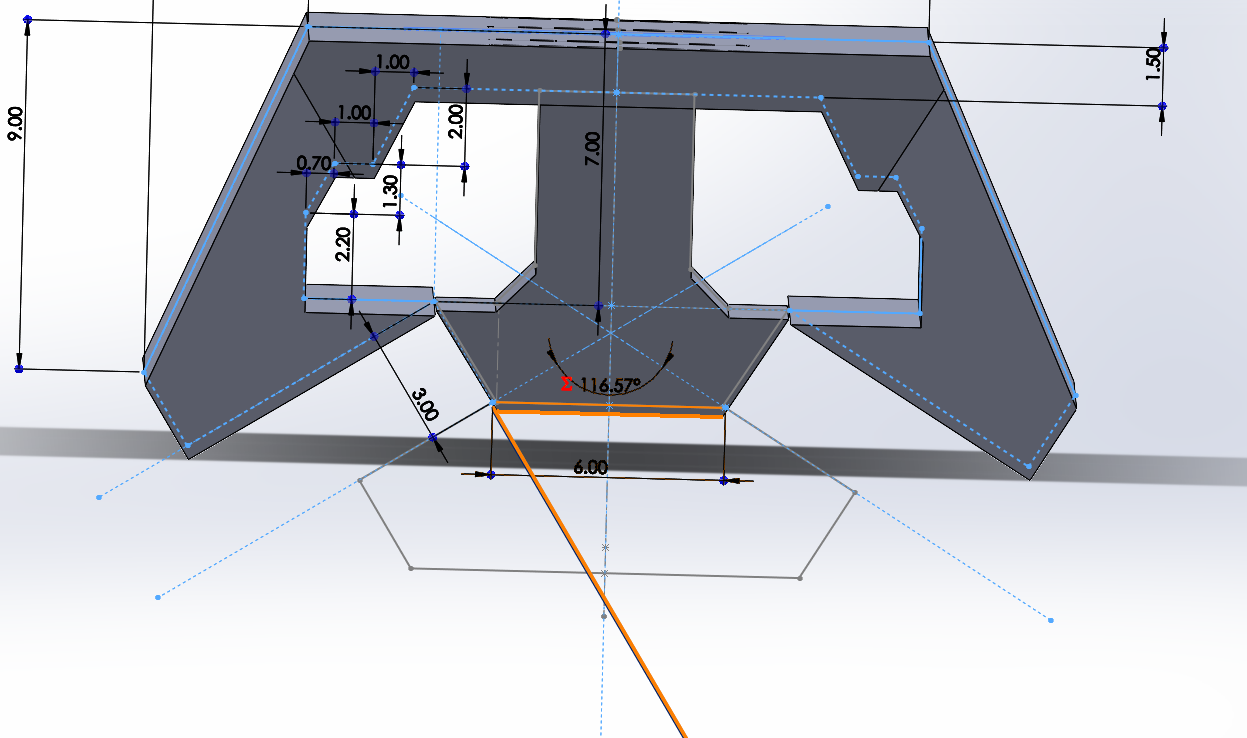
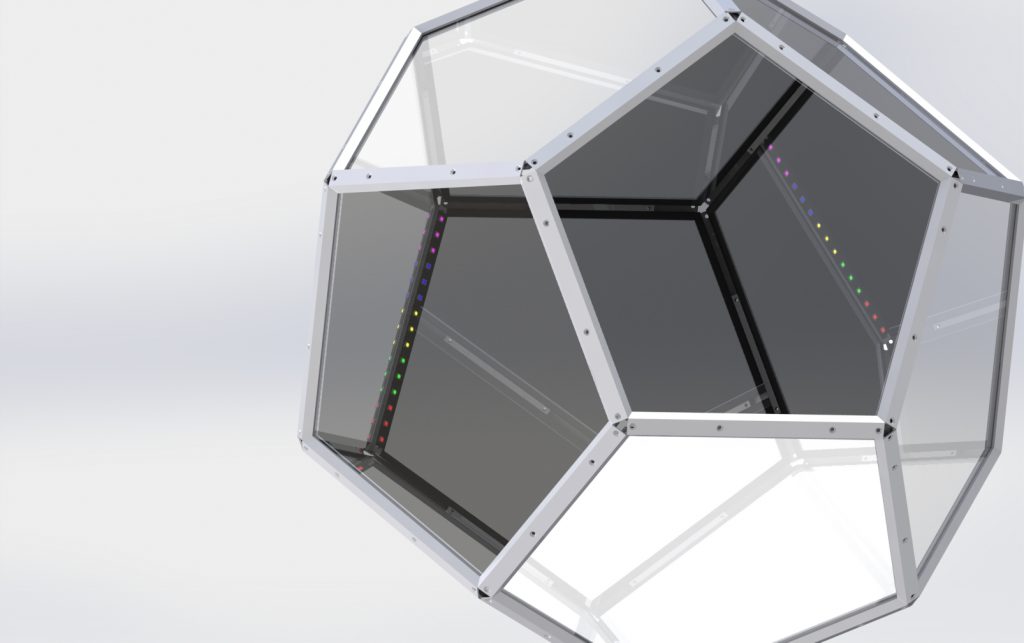
Im still a little hesitant to release everything since the assignment hasnt been graded yet, but heres some stuff that should be just fine, like a GPU render using solidworks Visualize, and a peek at the sketch for this thing.
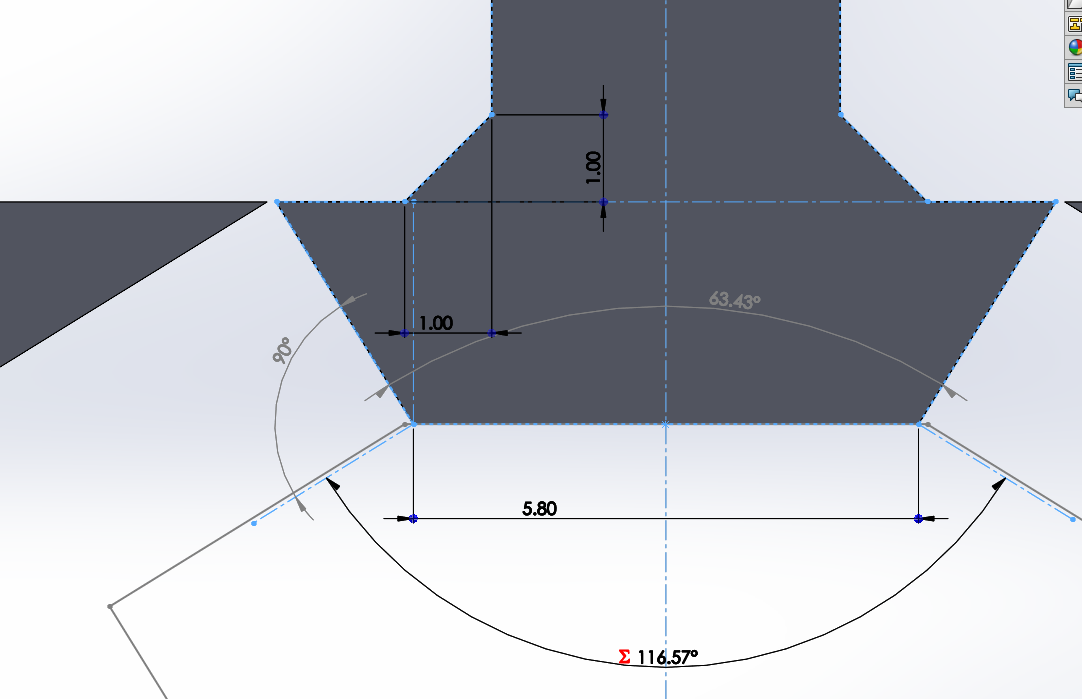
The long edge frames have been finished, the only remaining structural component is the vertex joints, but now that i figured out the formula for expressing the angle [ 2 arctan( (1 + √5)/2 ] the end joint will be a piece of cake. The assignment is due soon, ill post some specific geometry later after i submit it to avoid plagiarism detection issues.
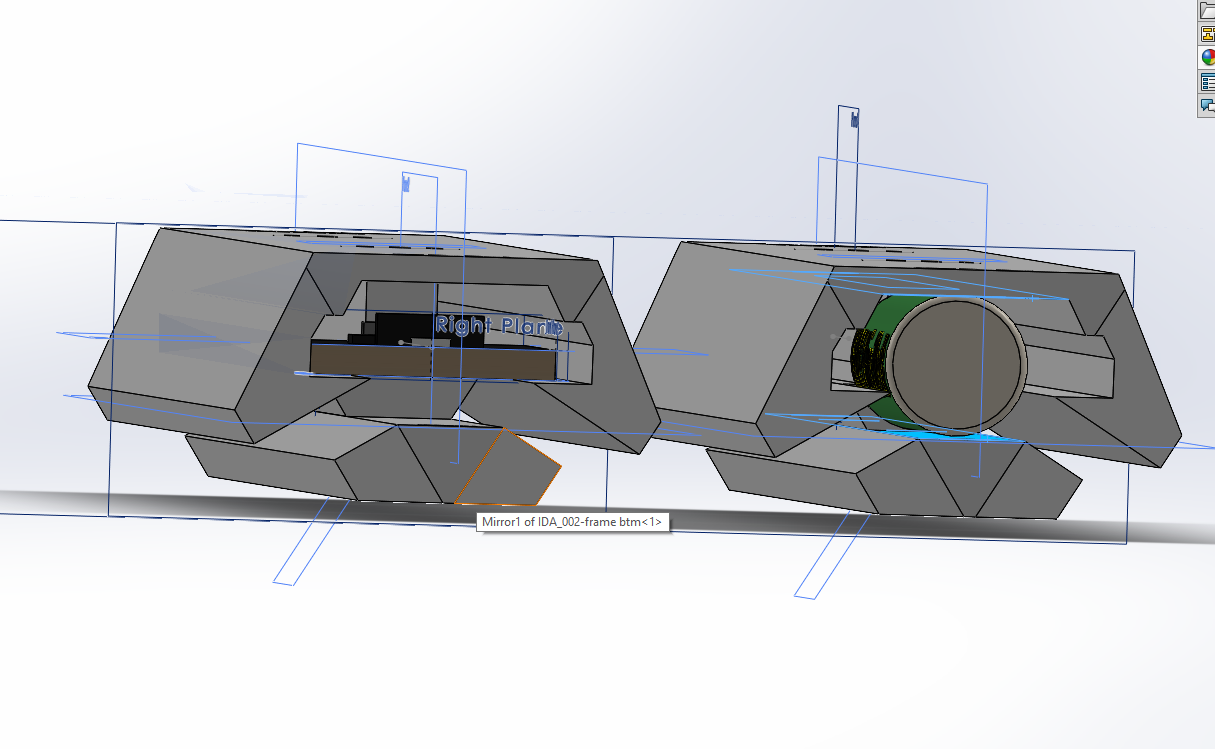
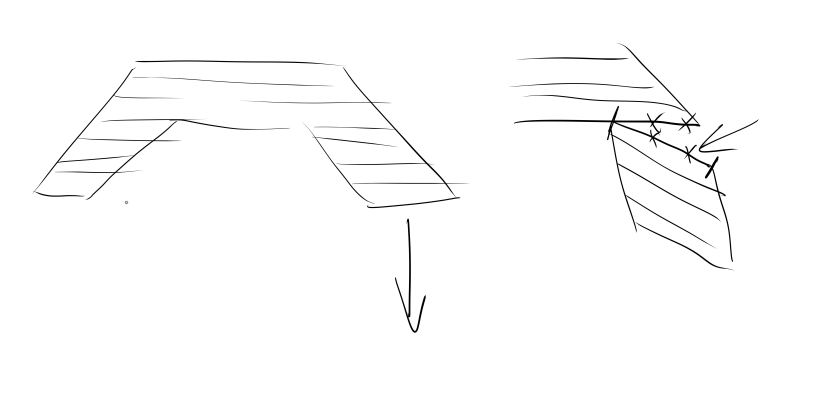
hopefully the frame holds up in practice, fortunately to stress test it i can use a short extrusion, and some random 3mm thick material to substitute the plexiglass pentagon. i only need to more or less eyeball it to get an idea of how it all fits together, based on the angle i can aproximate the distribution force (thanks engineering statics) in my head and determine if the printed frame is up to the task or not. Certain issues can likely be resolved if i rotate the frame in a weird way to change how the FDM layering fails. top to bottom with the layers horizontal it makes the layers prone to snapping under 90 degree angle force as illustrated below
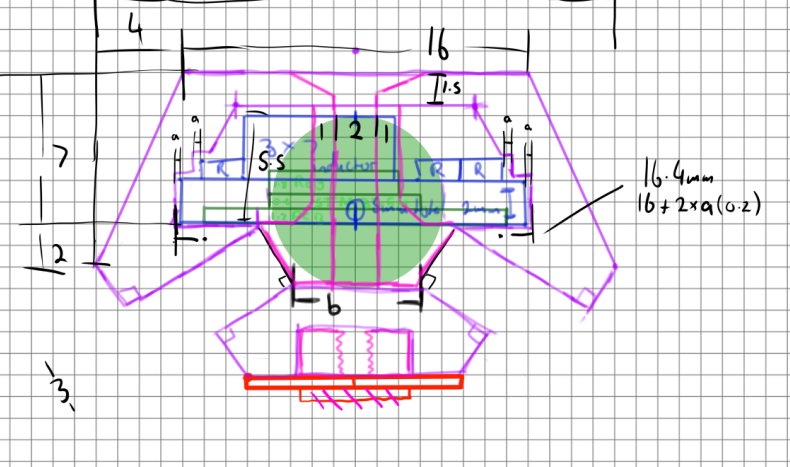
if i can make the fault lines much longer i can make it stronger, the perfect way to do this would be if i printed it vertically, unfortunately my printer isnt tall enough and this would demand an INSANE amount of support material to work. what i can do instead is flip it onto the diagonal side there, this would strengthen the frame considerably on that side, and though only slightly on the opposite side, it would still be stronger than purely horizontal. theres various other ways to improve the design, this is just one of the simplest ones that doesnt require changing it at all. A very simple one i could implement with only a slight change would be splinting those narrow walls, although if i printed a tiny hole it would fill, that area would still be a wide solid patch with no hole and could be drilled out, not that id need to, i could insert a heated metal pin into the diagonal “hole” (with a perfect print there would actually be a hole), 2-3 per side would protect it againt snapping. the ideal method though would be to find a way to get some high tensile metal to bear the brunt of the force.
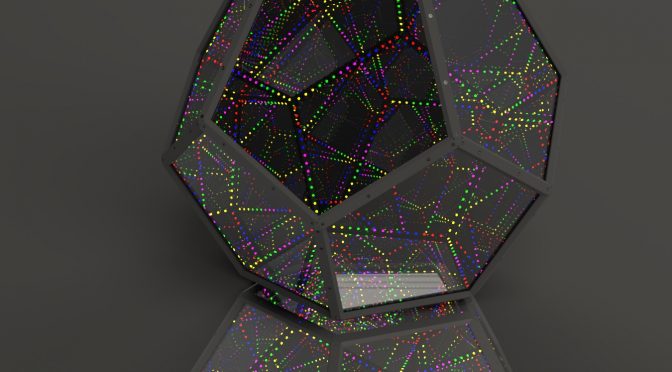
Hi, for my current digital modelling class i have been given free choice for my final assessment so i decided to kill two birds with one stone and use the opportunity to model out a blueprint for a perfect infinity dodecahedron. But this one would be different, all the controllers, batteries and circuitry will be inside the frame, no addons, no leads/wires for power, no stands, no blacked out fake-faces, just a perfect normal self contained dodecahedron!
Infinity dodecahedron example src: https://imgur.com/gallery/tjsw02s
An infinity-shape is essentially any geometric shape with tinted mirroring and lights on the inside, they almost endlessly reflect around and around creating trippy light patterns. Normally though the frame doesnt contain anything more than the wires, and portable ones with built in controller and power are never dodecahedrons, either they have a box hanging off, a stand, or one of the faces is extruded 1-2 inches thicker to hide a beefy controller, which also ends up blacking out that face so you kinda have to ignore it.
It occured to me that this would be vastly more effective than trying to parse keywords or use any sort of paid service. this uses googles captcha, i have read it uses google services that track the users activity and analyzes whether they are human or not, and if it triggers any flags, one of them i believe being even just using a VPN (bot armies need to run off VPNs usually), it forces the person to do one of those tests where you click on the image containing a bike or road sign.
All bots are at least somewhat suspicious and google internally takes notice of IPs where bot behaviour is detected, and for good reason, this isnt about being creepy big brother, bots can be used to produce false ad revenue. ignoring ad clicks, simply viewing a page with ads on it earns the host revenue, now imagine you have a botnet army, that is, several thousand malware infected computers you can freely control and have perform background operations. tell each one twice a day to simply open a page in an invisible browser from each supported affiliate site, and over 50 affiliates, you got yourself 100K pageviews per day, 100K ad views, or potentially 100K ad clicks. cost per clicks on ads can be something like 10-40 cents. in 1 day, if you create 50 random sites with ads, then control a botnet to have them all click on the ads, you could make 40K in a single day tricking google into thinking real people clicked those ads.
the solution? invisible captcha, google monitors the activity and can determine when behaviour changes, some online games like runescape use this to catch out bot accounts as well farming money and equipment, disrupting the in game economy and/or selling game currency.
Thats a little background on captcha, if your own wordpress blog or other site is having a ton of spammy comments (i get about 200 a month, or, got that is) try a simple reCaptcha, for most people most of the time, you click the “i am not a robot”, it tells you arent, and thats it, done, but now and then it might make you click on some pictures, taking a whole 10 seconds of your time, it inconveniences nobody.
I highly recommend it, especially over a paid parsing system that excludes comments based on keywords, for the time being i am disabling all content restrictions so commenters can freely link me images again.
I recently took up playing animal crossing to relax, and surprisingly it worked, normally games are not a healthy distraction from my studies, but this game genuinely does relax me, or it did. One of the major issues and great stresses of animal crossing is the lack of a “craft multiple items” feature when crafting items. Everything gets crafted 1 at a time, with an individual long animation between each instance, fortunately there is a “craft again” dialogue that pops up afterwards so you just have to mash the “A” button, but its annoying and time consuming, though if you seriously mash the “A” button repeatedly the animation speed doubles which is good.
Anyway, you might see this feature pop up in memes, people really wanted it added, it is good for making money (every day a random craftable item like furniture) becomes very valuable to sell, its quite useful early on in the game for making some capital, and later in the game making fish bait is still annoying to make to the extent many people dont even bother anymore. There are other games that run into similar problems, and im sure some people could find creative applications if they could run macros or repeaters, which has brought on my newest project.
A websocket is basically in this context a webpage where when you connect to the ESP 8266 or 32 through your browser, it maintains or streams a live connection, without having to refresh the page to see changes, or transmit data. You can see live feedback, or say, use a slider bar to control something, a simple GET/POST page cant do that, it would rely on refreshing the whole page or clicking a button to do things, during which time it has to connect again, a websocket however keeps the connection open for as long as the page is running.
Anyways, due to circumstances i wont just yet be making the hard-wired backlight dimmer, however, since the project now runs on an ESP board anyway, why not utilize the wifi capabilities. Another project im about to work on, technically altering an existing project, requires an interface, a LIVE interface, for an RBG controller, it also needs live feedback on the microphone so i can improve the responsiveness.
Im going to make my own or adapt, a generic websocket and make it ready to go, super easy to use for people as is, as well as adding this feature to the backlight driver. So, all you have to do is navigate to a fixed IP address (if you forget it theres also tools you can use to scan, or just look up the ESPs IP from your router), type that IP into your browser and a page will pop up with a slider bar or just 2 buttons and a numerical output, click and hold one to raise the brightness, the other to lower, its less risky and fiddly than using a voltage divider to pull -5v up to 0-3V positive. Though i will also add code to the driver to connect a resistor to it and the ‘ON’ line so that the monitor switches off when that signal goes off
Eventually i will still produce the complete circuit but for now this is safer and simpler, and since i have active prending work requiring the use of my cintiq, i cant really justify the slight risk of me causing problems by opening it again for the Nth time, since this time around im treading in uncharted waters, i also cant test anything using my scope to check for noise because that particular ground line when hooked up to the PC wants to leak a large amount of current out, enough to cause significant heating.
Anyway, the project will be completed soon, and in the comming days everyone will at least have everything they need to acheive a fully functional driver, with backlight and responds to the power button, its just going to take a few more weeks before i can have a completed driver that is a full replacement for the original
Its a pretty involved story that seems to be about 50% explaining literally every step involved in the process of proving the nature of the exfiltration. (exfiltration is the opposite of infiltration, means to sneak something out rather than in), so ill try to explain this in a reasonably simple and concise manner.
Here it is; wacom collects a list of the headers of programs, their “names” if you will, that you open during periods of activity on your tablet. They read just the names of programs you open or click on right after or during periods you use your tablet.
The text in the header is what they will see. Just its name though.
Wacoms goal in this is to quietly add support for any and all software that a lot of its customers appear to be using, it takes the names of the software, and uploads it to their private database, thats it. Ill elaborate a bit later on why this is so important for wacom though.
The problem this creates; the implications are minor however, depending on your stance on privacy you might have a problem with it, personally i couldnt give less of a shit, sure, occasionally they will see other software i exit paint tool sai, paint or photoshop from but all they see is the names and a timestamp. The risk is that a wacom employee with clearance, which no employee should really have (since the point is only to count programs used A LOT by everyone), can see an individuals program habits and exploit this in a really complex and obscure way. After a ridiculous amount of effort that would leave a huge digital papertrail (meaning doing illegal stuff with this would easily lead to termination of employment or otherwise being caught), at best a would-be hacker/criminal could send you some phishing emails or a virus (you probably will not download or your AV will block) that exploits one of the programs it sees you using, the risk/return of such an attack is too high for too little in an obscure way.
what to take from this; this was a huge dick move by wacom, the information they take is handled poorly and collected aggressively, because it poses an extremely low threat to end users they proportioned their level of care accordingly. It changes nothing though. Off the top of my head, wacom could instead not use google for this service, and just directly download the analytical data, what this means is decimating the potential for abuse of the data. All methods of abuse involve using the google data profile to match a tablet user with an online identity, remove this and the problems vanish.
why would they do this?
Its simple, ask yourself, why does anyone bother using wacom products? They are the best out there! But why are they so much better than the limited competition? Because they natively have the widest support for software. I think you see where im getting with this. Wacom collects the names of the software people often use its tablets with so they can properly direct their driver development efforts where its needed most, as well as catching onto new software. Its odd isnt it that niche or obscure new software seems to pop up and natively support advanced pen functions right? Wacom actively tracks what software is used, other tablet makers however simply focus on basic support while emphasizing use on the giants like photoshop and clip studio paint. Others dont bother at all and just rely on windows drivers for compatibility.
Wacom does this to control a monopoly on the pen tablet and display market so they can continue to charge their obscene high prices for their products. Its a niche market as it is, wacom doesnt really make a huge amount of profit even though their prices are so high, so its extremely hard for anyone to butt in on their turf, and this is how they maintain control.
So, in conclusion, your private data is safe, basic common sense level web security awareness will trump anyone who gets their hands on your data, and wacom should be embarrassed and fix this poor exploitable handling of your data, as a matter of respect not security, there are better ways to do it that anonymize its users. As Robert Heaton says, in spite of everything “this is essentially just a mouse”.
And on a parting note, you can pretty easily block wacom services from connecting to the internet via your firewall, i recommend the free program “tinywall” it will block everything you dont approve of explicitly including windows services that some programs use to sneak analytic data from, you can temporarily enable it to check for driver updates, or simply just make a point to check wacoms site for driver updates to download manually if you permablock it from your windows firewall instead.